How to Clean Coils on AC Unit Inside

How to Clean Coils on AC Unit Inside: A Comprehensive Guide

Introduction

In the scorching heat of summer, your air conditioning unit becomes your best friend, ensuring you stay relaxed and comfortable indoors. However, regular maintenance is crucial to keep your AC functioning efficiently. One essential aspect of AC maintenance is cleaning the coils, particularly those inside the unit. In this guide, we’ll walk you through the steps to effectively clean the coils on your AC unit, helping you ensure optimal performance and prolong its lifespan.

Understanding the Importance of Clean Coils

H1: Why Clean Coils Matter

Dirty coils can significantly reduce the efficiency of your air conditioning unit, leading to higher energy bills and potential damage to the system.

H2: Impact on Energy Efficiency

When coils are covered in dust, dirt, or debris, they can’t effectively transfer heat. This forces the system to work harder to cool your home, consuming more energy.

H2: Prevention of System Breakdowns

Regular coil cleaning prevents the buildup of grime that can cause corrosion or blockages, potentially leading to costly repairs or system failures.

Signs That Your Coils Need Cleaning

H1: Reduced Cooling Performance

If your AC isn’t cooling your home as effectively as it used to, dirty coils could be the culprit.

H2: Increased Energy Bills

A sudden spike in your energy bills without a corresponding increase in usage could indicate that your AC is working harder due to dirty coils.

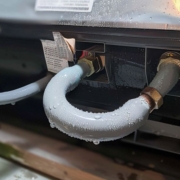
H2: Ice Formation on Coils

Ice buildup on the coils is a clear sign of restricted airflow, often caused by dirt and debris accumulation.

How to Clean Coils on AC Unit Inside

H1: Safety Precautions

Before you begin, ensure the power to your AC unit is turned off to prevent any accidents. Additionally, wear gloves and protective eyewear to shield yourself from cleaning chemicals and debris.

H1: Gather the Necessary Tools

You’ll need a soft brush, a vacuum cleaner with a soft brush attachment, a fin comb, a coil cleaner solution, and a spray bottle.

H1: Access the Coils

Depending on your AC unit’s design, you may need to remove a panel or access cover to reach the coils. Refer to your manufacturer’s instructions for guidance.

H1: Brush Away Surface Debris

Using the soft brush, gently remove any visible dust or debris from the coils. Be careful not to bend the delicate fins.

H1: Vacuum the Coils

Using the vacuum cleaner with the soft brush attachment, carefully vacuum the coils to remove finer particles and debris.

H1: Apply Coil Cleaner

Dilute the coil cleaner solution per the manufacturer’s instructions and spray it onto the coils. Allow it to sit for a few minutes to loosen stubborn dirt and grime.

H1: Rinse the Coils

Rinse the coils thoroughly to remove the cleaner and dislodged dirt using a spray bottle filled with water.

H1: Straighten Bent Fins

If you notice any bent fins during the cleaning process, use a fin comb to gently straighten them out, ensuring optimal airflow.

H1: Allow the Coils to Dry

Once cleaned, allow the coils to air dry before restoring power to the AC unit.

Conclusion

Regular maintenance, including cleaning the coils inside your AC unit, is essential for ensuring efficient operation and prolonging its lifespan. By following the steps outlined in this guide, you can keep your AC running smoothly, save energy, and avoid costly repairs.

FAQs (Frequently Asked Questions)

Q1: How often should I clean the coils on my AC unit?

A1: The coils should be cleaned at least once a year, preferably before the start of the cooling season.

Q2: Can I use household cleaners to clean the coils?

A2: To avoid damaging the coils or other components, it’s best to use coil cleaner solutions specifically designed for AC systems.

Q3: What if I notice mold or mildew on the coils?

A3: If mold or mildew is present, use a solution of water and mild detergent to clean the coils thoroughly. Rinse well and allow to dry completely.

Q4: Can I clean the coils or hire a professional?

A4: While cleaning the coils is a DIY task, hiring a professional HVAC technician is always best if you need clarification or are uncomfortable with the process.

Q5: Will cleaning the coils improve my AC’s cooling performance?

A5: Clean coils allow for better heat transfer, resulting in improved cooling performance and energy efficiency.

How Much Water Should Be in AC Drip Pan

How Much Water Should Be in AC Drip Pan

IntroductionAir conditioning systems are crucial to indoor comfort, especially during the hot summer. However, many homeowners need to pay more attention to adequately maintaining their AC units, including monitoring the water level in the drip pan. Understanding how much water should be in the AC drip pan ensures optimal performance and prevents potential issues.Ideal Water Level in AC Drip PanThe ideal water level in the AC drip pan depends on several factors, including the size of the unit, humidity levels, and the efficiency of the condensate removal system. The water level should generally be sufficient to facilitate the drainage of condensate generated during the cooling process. However, it should not exceed the drip pan’s capacity, as this can lead to overflow and water damage.Maintaining the proper water level is crucial for preventing mold and bacteria growth, which thrive in moist environments. Additionally, an excessively high water level can result in water leakage, damaging the AC unit and surrounding areas.How to Check Water Level in AC Drip PanChecking the water level in the AC drip pan is a simple process that can be done regularly as part of routine maintenance. Begin by locating the drip pan beneath the evaporator coil or air handler. Use a flashlight to inspect the interior of the drip pan and assess the water level.Ideally, the water level should be half an inch deep. If the water level exceeds this threshold, it may indicate a problem with the condensate removal system or excessive humidity. Conversely, if the drip pan is dry, it could indicate a blockage or malfunction in the system.Importance of Proper Water ManagementProper water management in the AC drip pan is essential for maintaining indoor air quality and preventing structural damage to the home. Excess water in the drip pan can create an environment conducive to mold and bacteria growth, which can compromise indoor air quality and pose health risks to occupants.Furthermore, water leakage from the drip pan can damage the AC unit, flooring, and surrounding structures. Over time, this can lead to costly repairs and maintenance expenses. By managing the water level in the drip pan effectively, homeowners can mitigate these risks and ensure the longevity and performance of their AC system.Methods to Maintain Optimal Water LevelThere are several methods homeowners can use to maintain the optimal water level in the AC drip pan. Regular inspection and cleaning of the drip pan can help prevent clogs and blockages that impede proper drainage. Additionally, installing a condensate pump or overflow switch can provide added protection against water overflow and leakage.By implementing these proactive measures, homeowners can effectively manage the water level in the AC drip pan and prevent potential issues associated with improper drainage. Investing time and effort into regular maintenance can save money on repairs and prolong the lifespan of the AC system.FAQs

  • What causes water to accumulate in the AC drip pan?Water accumulation in the AC drip pan is primarily caused by condensation from the cooling process. However, high humidity levels and clogged drain lines can exacerbate the issue.Can I remove excess water from the drip pan myself?Excess water can be removed from the drip pan using a wet/dry vacuum or manually draining it using a sponge or towel. However, if water accumulation is persistent, it may indicate an underlying issue that requires professional attention.Is it normal for the drip pan to be dry?While some moisture level is expected in the drip pan due to condensation, it should not be scorched. A dry drip pan may indicate a blockage in the condensate drain line or a malfunction in the AC system.How often should I check the water level in the drip pan?It is recommended to check the water level in the drip pan at least once a month, especially during periods of heavy AC usage. Additionally, conducting visual inspections of the drip pan during routine maintenance checks can help identify potential issues early on.Can a high water level in the drip pan affect AC performance?A high water level in the drip pan can affect AC performance by impeding proper drainage and causing water leakage. This can lead to reduced cooling efficiency and potential damage to the AC unit and surrounding structures.

  • ConclusionMaintaining the proper water level in the AC drip pan ensures optimal performance and prevents potential issues such as mold growth and water damage. By following the outlined guidelines and implementing proactive maintenance measures, homeowners can effectively manage the water level in the drip pan and prolong the lifespan of their AC system.

    How Much Electricity Does a Window AC Use

    How Much Electricity Does a Window AC Use

    Window air conditioners (ACs) are popular choices for cooling smaller spaces efficiently. Whether it’s a bedroom, office, or living room, these units offer a convenient solution to beat the heat. However, many consumers wonder about the electricity consumption of these devices. Let’s delve into the details to understand how much electricity a window AC typically uses.

    Introduction to Window ACs

    Window ACs are self-contained units designed to cool single rooms. They are mounted on windows or walls and work by drawing in warm air, passing it over cooling coils filled with refrigerant, and then releasing the cooled air back into the room. These units are known for their affordability, ease of installation, and effectiveness in smaller spaces.

    Understanding Electricity Consumption

    Factors affecting electricity usage

    Several factors influence the electricity consumption of a window AC, including:

    • Size and capacity: Larger units with higher BTU (British Thermal Unit) ratings consume more electricity.
    • Efficiency: Energy-efficient models consume less power to achieve the same level of cooling.
    • Usage habits: The duration of operation and temperature settings significantly impact energy usage.

    Energy Efficiency Ratio (EER)

    The Energy Efficiency Ratio (EER) measures an AC unit’s cooling capacity relative to its power consumption. A higher EER indicates better energy efficiency, meaning the AC consumes less electricity for the same cooling output.

    Average Electricity Consumption of Window ACs

    BTU rating and energy usage

    The BTU rating of a window AC indicates its cooling capacity. As a general rule, higher BTU ratings correlate with higher electricity consumption. For example, a 5,000 BTU unit typically consumes less power than a 10,000 BTU unit.

    Typical power consumption range

    A window AC unit consumes between 500 and 1500 watts per hour. However, this can vary based on the unit’s size, efficiency, and usage patterns.

    Impact of Usage Habits on Electricity Consumption

    Temperature settings

    Setting the thermostat to lower temperatures increases energy consumption. Opting for moderate temperature settings can help reduce electricity usage.

    Duration of usage

    The longer the AC runs, the more electricity it consumes. Turning off the unit when not needed and using programmable thermostats can minimize unnecessary usage.

    Maintenance and cleaning

    Regular maintenance, including cleaning or replacing air filters and ensuring proper insulation around the unit, can optimize performance and reduce energy consumption.

    Tips to Reduce Electricity Usage

    Optimal temperature settings

    Set the thermostat to the highest comfortable temperature to reduce energy consumption without sacrificing comfort.

    Proper sizing of AC unit

    Choose an appropriately sized unit for the space to avoid overworking the AC, which can lead to higher electricity bills.

    Regular maintenance

    Schedule routine maintenance, including cleaning filters, coils, and vents, to ensure optimal performance and energy efficiency.

    Environmental Impact of Window ACs

    Energy consumption and carbon footprint

    Window ACs contribute to electricity consumption, impacting the environment through carbon emissions from power generation. Choosing energy-efficient models and minimizing usage can reduce this environmental impact.

    Comparison with other cooling options

    Compared to central air conditioning systems, window ACs are generally more energy-efficient for cooling smaller spaces. However, alternatives such as fans and evaporative coolers consume less electricity but may provide a different level of cooling.

    Conclusion

    Window air conditioners offer a convenient cooling solution for single rooms, but their electricity consumption varies based on size, efficiency, and usage habits. Consumers can minimize their environmental impact and reduce electricity bills by understanding these factors and implementing energy-saving practices.

    FAQs

    1. How do I determine the right size of a window AC for my room?
    • Measure the room’s square footage and refer to the manufacturer’s guidelines for BTU recommendations.
    1. Do window AC units with higher EER ratings cost more?
    • Energy-efficient models may have a higher upfront cost but can lead to long-term savings on electricity bills.
    1. Can I use a window AC to cool multiple rooms?
    • Window ACs are designed for single-room cooling and may only effectively cool multiple rooms if they are small and well-insulated.
    1. Is it better to leave the AC running all day or turn it on only when needed?
    • It’s more energy-efficient to turn the AC off when not needed and use programmable thermostats to regulate temperature based on occupancy.
    1. How often should I clean or replace the air filter in my window AC?
    • Check the manufacturer’s recommendations, but generally, filters should be cleaned or replaced every 1-3 months to maintain optimal performance.
    How Long Does an AC Capacitor Last

    How Long Does an AC Capacitor Last?

    Introduction

    When it comes to the longevity of your air conditioning system, one crucial component to consider is the AC capacitor. This small but mighty device plays a significant role in the proper functioning of your AC unit. Understanding how long an AC capacitor lasts and the factors affecting its lifespan is essential for maintaining your cooling system efficiently.

    What is an AC Capacitor?

    An AC capacitor, short for air conditioning capacitor, is an electrical component that stores and releases electrical energy to help start the compressor and fan motors in your air conditioning system. It acts as a temporary battery, supplying the extra voltage needed during startup.

    Types of AC Capacitors

    Two main types of AC capacitors are used in air conditioning systems: start capacitors and run capacitors. Start capacitors provide the extra torque needed to start the compressor, while run capacitors help maintain a consistent voltage supply to keep the motor running smoothly.

    Factors Affecting AC Capacitor Lifespan

    Several factors influence the lifespan of an AC capacitor, including:

    • Usage Frequency: The more often your air conditioning system operates, the more strain it puts on the capacitor.
    • Operating Conditions: Extreme temperatures and humidity levels can affect the performance and longevity of capacitors.
    • Quality of Capacitor: Higher-quality capacitors tend to last longer and withstand harsher conditions better.
    • Environmental Factors: Exposure to dust, debris, and other contaminants can degrade the capacitor over time.

    Signs of a Failing AC Capacitor

    Knowing the warning signs of a failing AC capacitor can help prevent unexpected breakdowns. Common symptoms include weak airflow, warm air from the vents, and unusual noises such as humming or buzzing.

    Average Lifespan of AC Capacitors

    The average lifespan of an AC capacitor can vary depending on several factors, but generally, start capacitors last around 5 to 10 years, while run capacitors have a lifespan of 10 to 20 years.

    Extending the Lifespan of AC Capacitors

    Regular maintenance and servicing can extend the lifespan of your AC capacitor. This includes cleaning the unit, inspecting for any signs of damage, and replacing worn-out parts as needed.

    Replacing an AC Capacitor

    If your AC capacitor shows signs of failure, it must be replaced promptly to avoid further damage to your air conditioning system. While some homeowners may choose to replace the capacitor themselves, hiring a professional is recommended to ensure safety and proper installation.

    Cost of AC Capacitor Replacement

    The cost of replacing an AC capacitor can vary depending on factors such as the type of capacitor, the brand, and the contractor’s labor fees. On average, homeowners can expect to pay anywhere from $100 to $500 for capacitor replacement.

    Conclusion

    Regular maintenance and timely replacement of AC capacitors are crucial for ensuring the longevity and efficiency of your air conditioning system. By understanding the factors affecting capacitor lifespan and recognizing the warning signs of failure, you can keep your home relaxed and comfortable year-round.

    FAQs

    1. How do I know if my AC capacitor is failing?
    • Signs of a failing AC capacitor include weak airflow, warm air from vents, and strange noises from the unit.
    1. Can I replace my AC capacitor myself?
    • While some homeowners may attempt DIY capacitor replacement, hiring a professional for safety and proper installation is recommended.
    1. How often should AC capacitors be inspected?
    • AC capacitors should be inspected annually as part of routine maintenance to ensure they are in good working condition.
    1. Are there any warning signs before an AC capacitor fails?
    • Common warning signs of a failing AC capacitor include decreased cooling performance and unusual noises from the unit.
    1. What happens if I don’t replace a failing AC capacitor?
    • Ignoring a failing AC capacitor can lead to further damage to your air conditioning system, potentially resulting in more costly repairs.
    Does Cabin Air Filter Affect AC

    Does Cabin Air Filter Affect AC?

    Imagine driving on a scorching summer day, seeking solace in the cool embrace of your car’s air conditioning system, only to find it struggling to provide relief. One of the often-overlooked culprits behind such AC woes could be a neglected component – the cabin air filter.

    Introduction

    The cabin air filter is a vital but often underrated component of a vehicle’s HVAC (Heating, Ventilation, and Air Conditioning) system. It acts as a barrier, preventing dust, pollen, pollutants, and other debris from entering the vehicle’s cabin through the HVAC system. While its primary purpose is to maintain air quality inside the car, it also plays a crucial role in adequately functioning the AC system.

    The function of Cabin Air Filter

    The cabin air filter serves as a guardian, filtering out harmful particles and pollutants from the outside air before they circulate inside the vehicle’s cabin. By trapping dust, pollen, mold spores, and other contaminants, it ensures that the air entering the cabin is clean and free from allergens, safeguarding passengers’ health and comfort.

    Impact of a Dirty Cabin Air Filter on AC Performance

    A neglected or clogged cabin air filter can significantly impact the performance of the AC system. Over time, dirt and debris accumulate in the filter, impedeing airflow into the cabin and forcing the AC system to work harder to maintain the desired temperature. This increased workload not only strains the AC components but also leads to reduced cooling efficiency and airflow.

    Symptoms of a Clogged Cabin Air Filter

    Recognizing the signs of a clogged cabin air filter is crucial for maintaining optimal AC performance. Some common symptoms include weak airflow from the vents, a musty or unpleasant odor when the AC is turned on, and increased allergies or respiratory issues among passengers.

    Benefits of Regular Cabin Air Filter Replacement

    Regular cabin air filter replacement offers numerous benefits. It ensures improved air quality inside the vehicle, enhances the performance of the AC system, and contributes to the longevity of AC components by reducing strain and wear.

    How Often Should You Replace Your Cabin Air Filter?

    The frequency of cabin air filter replacement varies depending on several factors, including driving conditions, environmental pollutants, and the manufacturer’s recommendations. As a general rule of thumb, replacing the cabin air filter every 12,000 to 15,000 miles or as recommended in the vehicle’s owner’s manual is advisable.

    DIY vs. Professional Replacement

    While replacing the cabin air filter is a relatively simple task that can be done DIY, opting for professional replacement offers certain advantages. DIY enthusiasts can follow step-by-step instructions in the owner’s manual or online tutorials, whereas professional replacement ensures precision and thorough inspection of the entire HVAC system.

    Choosing the Right Cabin Air Filter

    When selecting a replacement cabin air filter, it’s essential to consider factors such as OEM (Original Equipment Manufacturer) vs. aftermarket filters, filtration efficiency ratings, and the material used. While OEM filters are designed specifically for your vehicle, aftermarket filters may offer comparable performance at a lower cost.

    Maintaining Your AC System

    In addition to regular cabin air filter replacement, proper maintenance of the entire AC system is crucial for optimal performance. This includes periodic inspections, cleaning AC components, and promptly addressing any issues to prevent costly repairs down the line.

    Common Misconceptions About Cabin Air Filters

    Dispelling common myths surrounding cabin air filters is essential for understanding their impact on AC performance. Contrary to popular belief, a dirty cabin air filter not only affects air quality but also significantly hampers the efficiency of the AC system, leading to increased energy consumption and potential damage to AC components.

    FAQs

    1. What happens if I don’t replace my cabin air filter?
    • Neglecting cabin air filter replacement can lead to reduced airflow, decreased AC performance, and potential damage to AC components.
    1. Can a dirty cabin air filter cause AC compressor failure?
    • A clogged cabin air filter can overwork the AC compressor, leading to premature wear and potential failure.
    1. How do I know if my cabin air filter needs replacing?
    • Signs of a clogged cabin air filter include weak airflow, unpleasant odors, and increased allergies or respiratory issues.
    1. Can I clean and reuse a cabin air filter?
    • While some filters are washable and reusable, most are designed for single-use replacement to ensure optimal filtration efficiency.
    1. Are expensive cabin air filters better than cheaper ones?
    • Not necessarily. The key lies in choosing a filter with the appropriate efficiency rating and material suitable for your vehicle’s needs.

    Conclusion

    In conclusion, the cabin air filter plays a crucial role in maintaining air quality and AC performance inside your vehicle. By understanding its function and importance and adhering to a regular maintenance schedule, you can ensure a comfortable and healthy driving experience for you and your passengers.

    Do Window AC Units Use a Lot of Electricity

    Do Window AC Units Use a Lot of Electricity?

    Introduction to Window AC Units

    Window air conditioning units are popular for cooling individual rooms or small spaces. They are versatile, affordable, and easy to install, making them a convenient option for many households. However, one common concern among consumers is the electricity consumption associated with these units.

    Understanding Electricity Consumption

    The amount of electricity a window AC unit uses depends on various factors, including its size, efficiency, and usage patterns. While these units consume electricity, the extent they impact your energy bill can vary significantly.

    Energy Efficiency Ratings

    To help consumers make informed decisions, window AC units come with energy efficiency ratings. One of the most commonly used metrics is the Seasonal Energy Efficiency Ratio (SEER). This rating indicates how efficiently the unit converts electricity into cooling power.

    Calculating Energy Consumption

    To estimate the energy consumption of a window AC unit, you can use a simple formula based on its wattage and the number of hours it runs. By understanding this calculation, consumers can better manage their energy usage and anticipate their electricity bills.

    Comparing Window AC Units with Other Cooling Options

    Comparing window AC units’ energy consumption with alternative cooling solutions is essential when considering their energy consumption. Central air conditioning systems and portable AC units may offer different efficiency levels and operational costs.

    Tips for Reducing Energy Consumption

    Several strategies can be employed by homeowners to minimize the electricity usage of their window AC units. Regular maintenance, proper sizing, and thoughtful usage patterns can all contribute to energy savings without sacrificing comfort.

    Environmental Impact of Window AC Units

    In addition to their electricity consumption, window AC units can have environmental implications. By choosing energy-efficient models and exploring eco-friendly alternatives, consumers can reduce their carbon footprint and contribute to sustainability efforts.

    Cost Considerations

    While window AC units may have lower upfront costs than central air conditioning systems, the long-term financial implications must be considered, consumers can make cost-effective decisions by weighing factors such as energy efficiency and maintenance expenses.

    Conclusion

    In conclusion, window AC units consume electricity, but the amount varies depending on several factors. Consumers can minimize their environmental impact and control their cooling costs by understanding energy efficiency ratings, calculating energy consumption, and implementing energy-saving strategies.

    Unique FAQs

    1. How much electricity does a typical window AC unit consume?
    • The electricity consumption of a window AC unit can vary depending on its size, efficiency, and usage patterns. On average, a unit may consume anywhere from 500 to 1500 watts per hour of operation.
    1. Are newer window AC units more energy-efficient?
    • In general, newer window AC units are more energy-efficient than older models. Look for units with higher SEER ratings, which indicate better energy performance.
    1. Can using a fan with a window AC unit reduce electricity usage?
    • Using a fan with a window AC unit can help distribute cool air more efficiently, allowing you to set the thermostat higher and reduce overall electricity usage.
    1. Do window AC units contribute to peak energy demand?
    • During hot summer months, the widespread use of window AC units can contribute to peak energy demand, straining the electrical grid. However, adopting energy-saving practices can help mitigate this impact.
    1. Are there government incentives for purchasing energy-efficient window AC units?
    • Some government agencies and utility companies offer rebates or incentives for purchasing energy-efficient appliances, including window AC units. Check with your local authorities to see if any programs are available.
    Which of the Following Components Converts AC to DC

    Which of the Following Components Converts AC to DC?

    Introduction

    Understanding the conversion of alternating current (AC) to direct current (DC) is fundamental in numerous electronic applications. This article will delve into the components responsible for this conversion process and their significance in various technological fields.

    What is AC?

    An alternating current, abbreviated as AC, is an electrical current that periodically reverses direction. It is commonly used in household electrical systems and power transmission due to its ability to distribute electricity over long distances efficiently.

    What is DC?

    Direct current, or DC, is an electrical current that flows in one direction with a constant voltage polarity. DC power is essential for many electronic devices, including computers, mobile phones, and battery-operated equipment.

    Importance of AC to DC Conversion

    While AC suits long-distance transmission, many electronic devices require DC power. Therefore, converting AC to DC is crucial for powering these devices efficiently.

    Components of AC to DC Conversion

    Several components play vital roles in converting AC to DC:

    Rectifier

    A rectifier is a device used to convert AC to DC by allowing current to flow in only one direction. It typically consists of diodes arranged in a specific configuration.

    Diodes

    Diodes are semiconductors that allow current to flow in one direction while blocking it in the opposite direction. They play a crucial role in rectifying AC to DC.

    Bridge Rectifiers

    A bridge rectifier is a circuit that utilizes four diodes in a bridge configuration to convert AC to DC. It offers advantages such as higher efficiency and a more straightforward design.

    Transformer

    Transformers are used in AC-DC conversion to step up or step down voltage levels before rectification. They help adjust the voltage to the desired level.

    Capacitors

    Capacitors are utilized in AC-to-DC conversion circuits to filter and smooth the output voltage. They reduce ripple and noise, resulting in a more stable DC output.

    Voltage Regulators

    Voltage regulators maintain a constant output voltage regardless of input voltage or load fluctuations. They ensure that the converted DC power remains within a specified range.

    Integrated Circuits (ICs)

    Integrated circuits contain multiple components on a single semiconductor chip and are commonly used in AC-to-DC conversion circuits for improved efficiency and compactness.

    Applications

    AC to DC conversion is essential in various applications, including power supplies for electronic devices, battery charging systems, and renewable energy sources such as solar panels and wind turbines.

    Recent Technological Advances

    AC to DC conversion technology advancements have led to more efficient and reliable power conversion systems. These include innovations in semiconductor materials, circuit design, and power management techniques.

    Conclusion

    In conclusion, the conversion of AC to DC is facilitated by a combination of components such as rectifiers, diodes, transformers, capacitors, voltage regulators, and integrated circuits. Understanding these components is crucial for designing efficient power supply systems for modern electronic devices.

    FAQs

    1. Why is AC converted to DC?
    • AC is converted to DC because many electronic devices require a steady supply of direct current to function correctly.
    1. What is the difference between AC and DC?
    • AC changes direction periodically, while DC flows in one direction continuously.
    1. What are the benefits of using a bridge rectifier?
    • Bridge rectifiers offer higher efficiency, more straightforward design, and improved reliability than other rectification methods.
    1. How do capacitors contribute to AC to DC conversion?
    • Capacitors filter and smooth the output voltage, reducing ripple and noise in the DC output.
    1. What are some typical applications of AC to DC conversion?
    • Typical applications include power supplies for electronic devices, battery charging systems, and renewable energy sources.
    Where is the AC Pressure Switch Located

    Where is the AC Pressure Switch Located?

    Have you ever wondered where your vehicle’s AC pressure switch is located? If you’ve experienced issues with your air conditioning system, understanding the location of the AC pressure switch can be crucial for troubleshooting and maintenance. In this article, we’ll delve into the details of the AC pressure switch, its significance, common malfunction symptoms, and most importantly, how to locate it in your vehicle.

    Introduction to AC Pressure Switch

    The AC pressure switch, also known as the AC pressure sensor, is essential to modern automotive air conditioning systems. It plays a vital role in regulating the pressure of the refrigerant within the AC system to ensure optimal performance and safety.

    Importance of AC Pressure Switch in Automotive Systems

    The AC pressure switch monitors the refrigerant pressure circulating within the air conditioning system. It shuts off the compressor if the pressure exceeds safe levels, helping prevent damage to the compressor and other components.

    Understanding the Function of AC Pressure Switch

    The primary function of the AC pressure switch is to monitor the refrigerant pressure and signal the compressor to engage or disengage accordingly. When the pressure reaches a predetermined threshold, the switch sends a signal to the compressor clutch to either activate or deactivate, maintaining the ideal pressure levels within the system.

    Common Symptoms of a Faulty AC Pressure Switch

    A malfunctioning AC pressure switch can lead to various issues with your vehicle’s air conditioning system. Some common symptoms include:

    • Inconsistent cooling
    • AC compressor cycling frequently
    • Inoperative air conditioning system

    Locating the AC Pressure Switch in a Vehicle

    The exact location of the AC pressure switch can vary depending on the make and model of your vehicle. However, it is typically located near the AC compressor or within the refrigerant line.

    Steps to Locate the AC Pressure Switch

    1. Identify the AC Compressor: The AC compressor is usually located at the front of the engine bay.
    2. Follow the Refrigerant Lines: Trace the refrigerant lines from the AC compressor to locate the AC pressure switch.
    3. Refer to the Vehicle Manual: If you’re unsure about the location, consult your vehicle’s manual for guidance.

    Tools Required for Locating the AC Pressure Switch

    • Flashlight
    • Safety gloves
    • Safety goggles

    Safety Precautions Before Locating the AC Pressure Switch

    Before locating the AC pressure switch, ensure the engine is turned off, and the vehicle is parked on a level surface. Additionally, wear safety gloves and goggles to protect yourself from potential hazards.

    Procedure to Locate the AC Pressure Switch in Different Types of Vehicles

    Passenger Cars

    1. Open the hood of the vehicle.
    2. Locate the AC compressor near the front of the engine bay.
    3. Follow the refrigerant lines from the compressor to find the AC pressure switch.

    Trucks/SUVs

    1. Access the engine compartment.
    2. Locate the AC compressor, usually positioned near the front of the engine.
    3. Follow the refrigerant lines to locate the AC pressure switch.

    Tips for Efficiently Locating the AC Pressure Switch

    • Use a flashlight to illuminate hard-to-reach areas.
    • Take your time and carefully inspect the area around the AC compressor.
    • Refer to online forums or consult a professional mechanic for assistance if needed.

    Maintenance Tips for AC Pressure Switch

    • Regularly inspect the AC pressure switch for any signs of damage or corrosion.
    • Keep the surrounding area clean to prevent debris from accumulating and affecting the switch’s performance.

    When to Seek Professional Help

    If you cannot locate the AC pressure switch or suspect it’s malfunctioning, it’s advisable to seek assistance from a qualified mechanic. Attempting DIY repairs without the necessary expertise can lead to further damage and safety risks.

    Cost of Replacing an AC Pressure Switch

    The cost of replacing an AC pressure switch can vary depending on the make and model of your vehicle, as well as labor costs. You can expect to pay between $100 to $300 for parts and labor.

    DIY vs. Professional Replacement of AC Pressure Switch

    While some vehicle owners may attempt to replace the AC pressure switch themselves, they should consider the task’s complexity and potential risks. Unless they have experience working with automotive HVAC systems, it’s generally safer and more efficient to entrust the job to a professional mechanic.

    Conclusion

    The AC pressure switch is a critical component of your vehicle’s air conditioning system, ensuring optimal performance and safety. By understanding its function and locating it, you can effectively troubleshoot issues and ensure proper AC system maintenance.

    FAQs (Frequently Asked Questions)

    1. How do I know if my AC pressure switch is bad?
    • Look for symptoms such as inconsistent cooling, frequent compressor cycling, or a malfunctioning AC system.
    1. Can I drive with a bad AC pressure switch?
    • While it’s possible to drive with a faulty AC pressure switch, it’s not recommended as it can further damage the AC system.
    1. What causes an AC pressure switch to fail?
    • Corrosion, electrical issues, or excessive pressure within the AC system are common causes of AC pressure switch failure.
    1. Is it safe to replace the AC pressure switch myself?
    • Unless you have experience working with automotive HVAC systems, having the AC pressure switch replaced by a professional mechanic is safer.
    1. How much does it cost to replace an AC pressure switch?
    • The cost of replacing an AC pressure switch can vary, but on average, you can expect to pay between $100 and $300 for parts and labor.
    How to Flush Your AC System for Optimal Performance

    How to Flush Your AC System for Optimal Performance

    Introduction

    Maintaining your vehicle’s air conditioning (AC) system is crucial for optimal performance and comfort, especially during the hot summer. One essential aspect of AC maintenance is flushing the system. In this article, we’ll delve into the importance of flushing your AC system and provide a comprehensive guide on how to do it effectively.

    Understanding the AC System

    Before diving into the flushing process, it’s essential to understand the components of your vehicle’s AC system. The primary components include the compressor, condenser, evaporator, expansion valve, and refrigerant lines. Each plays a vital role in the cooling process.

    Signs That Your AC System Needs Flushing

    Several indicators suggest that your AC system requires flushing. These include reduced cooling efficiency, unusual noises or smells emanating from the vents, and inconsistent airflow. Ignoring these signs can lead to further damage and costly repairs.

    Importance of Flushing the AC System

    Flushing the AC system is crucial for maintaining optimal performance and prolonging its lifespan. Flushing enhances the system’s efficiency and prevents potential malfunctions by removing contaminants such as debris, moisture, and old refrigerant.

    Tools and Materials Required

    Before starting the flushing process, gather the necessary tools and materials. These may include safety gloves, safety goggles, a flushing agent, refrigerant, a vacuum pump, and wrenches.

    Step-by-Step Guide to Flushing the AC System

    Preparation

    Begin by ensuring that your vehicle is parked in a well-ventilated area. Put on safety gloves and goggles to protect yourself from harmful chemicals. Locate the AC system’s low-pressure service port and disconnect the battery’s negative terminal.

    Disconnecting the Lines

    Disconnect the refrigerant lines from the compressor, condenser, and evaporator using wrenches. Be cautious to avoid damaging the lines or components.

    Flushing the System

    Attach a flushing agent to the low-pressure service port and flush the system according to the manufacturer’s instructions. Ensure that all contaminants are thoroughly removed from the lines and components.

    Reconnecting the Lines

    Once the flushing process is complete, reconnect the refrigerant lines to the compressor, condenser, and evaporator. Tighten the connections securely to prevent leaks.

    Adding Refrigerant

    Using a vacuum pump, evacuate any air from the system. Then, add the appropriate amount of refrigerant to the AC system. Refer to your vehicle’s specifications for the correct refrigerant type and quantity.

    Safety Precautions to Consider

    When flushing your AC system, it’s essential to prioritize safety. Wear protective gear, including gloves and goggles, to shield yourself from harmful chemicals. Additionally, adequate ventilation in the work area should be ensured to prevent inhalation of fumes.

    Common Mistakes to Avoid

    While flushing your AC system, avoid common mistakes that could compromise its effectiveness. These include overlooking system leaks, using incorrect flushing agents, and neglecting to vacuum the system after flushing.

    FAQs

    How often should you flush your AC system?

    The frequency of AC system flushing depends on various factors, including the vehicle’s age, usage, and environmental conditions. As a general rule, flushing is recommended every two to three years or when signs of contamination are evident.

    Can I flush my AC system myself?

    While it’s possible to flush your AC system yourself, having the necessary tools, materials, and expertise is essential. If you need clarification or are uncomfortable with the process, it’s best to seek professional assistance.

    What flushing agent should I use?

    Various flushing agents are available on the market, each designed for specific AC systems and contaminants. Choosing a flushing agent recommended by your vehicle’s manufacturer is crucial, and following the instructions carefully is vital.

    Is it necessary to vacuum the system after flushing?

    Yes, vacuuming the system after flushing removes any remaining moisture and air. This ensures optimal performance and prevents potential damage to the AC components.

    How long does it take to flush an AC system?

    The time required to flush an AC system can vary depending on the extent of contamination and the flushing method used. On average, the process can take anywhere from one to three hours.

    Conclusion

    Flushing your AC system is a crucial aspect of maintenance that ensures optimal performance and longevity. Following the steps outlined in this article and prioritizing safety, you can effectively flush your AC system and enjoy cool, comfortable rides for years.