

How to Test an AC Capacitor with a Multimeter
The capacitor is a critical component in an air conditioning system. It stores and releases electrical energy to help start and run the compressor and fan motors. A failing capacitor can cause the AC to struggle, make unusual noises, or fail to operate entirely. Testing an AC capacitor with a multimeter allows homeowners and technicians to determine whether the component is functioning correctly.
Understanding AC Capacitors
AC systems typically use two types of capacitors: start capacitors and run capacitors. Start capacitors provide a short burst of energy to help motors start, while run capacitors supply continuous energy to maintain efficient operation. Capacitors are rated in microfarads (µF), and this rating indicates their storage capacity. They also have voltage ratings, such as 370V or 440V, to match the system requirements.
A faulty capacitor can prevent the AC motor from starting, cause the unit to overheat, or lead to repeated tripping of breakers. Common signs include humming noises, slow fan operation, or the system failing to cool. Testing the capacitor can confirm whether replacement is necessary.
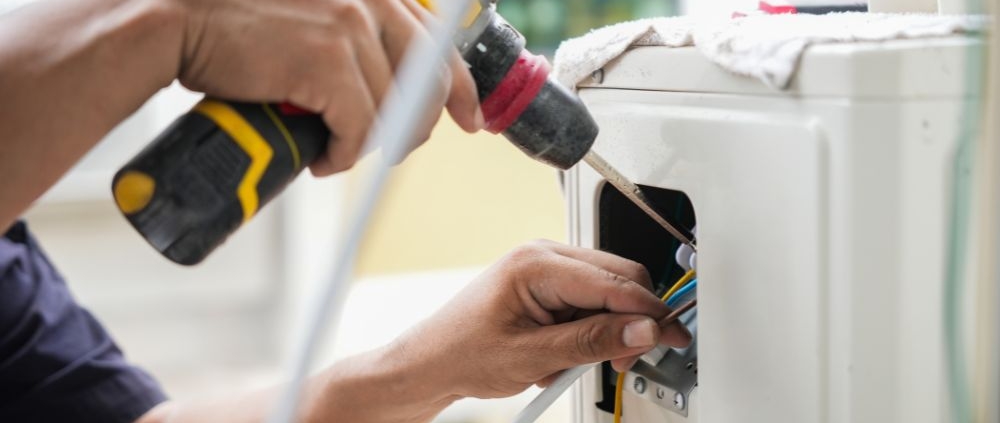
Preparing to Test a Capacitor
Safety is crucial because capacitors store high voltage even when the system is powered off. Before testing, turn off the AC at the breaker and disconnect the capacitor from the circuit. Use an insulated screwdriver to discharge the capacitor by bridging its terminals. Proper discharge prevents electric shock during testing.
Select a digital multimeter with a capacitance testing function. If the multimeter does not have capacitance mode, it may be possible to test resistance to check for a shorted capacitor, but this method is less accurate. Ensure the multimeter is rated for the capacitor’s voltage range.
Steps to Test an AC Capacitor
Identify the capacitor terminals, usually labeled C (common), HERM (compressor), and FAN. Remove the wires carefully and note their positions for reconnection. Set the multimeter to the capacitance mode and connect the probes to the capacitor terminals.
For a dual-run capacitor, test between C and HERM and then C and FAN. The measured capacitance should match the rating printed on the capacitor, typically within ±6% tolerance. If the reading is significantly lower or higher than the rated value, the capacitor is faulty.
Another method is the resistance test for non-capacitance multimeters. Connect the probes to the terminals and observe the meter. A healthy capacitor shows a rising resistance as it charges. If the reading stays at zero or infinity, the capacitor is defective.
After testing, discharge the capacitor again if necessary and reconnect it according to the wiring diagram. Proper installation ensures the AC operates efficiently and safely.
Common Issues with AC Capacitors
Capacitors can fail due to age, heat, voltage spikes, or electrical stress. Signs of failure include bulging, leaking fluid, or visible burn marks. Even if the capacitor appears intact, it can still fail internally and affect system performance. Regular inspection and testing can prevent unexpected AC breakdowns.
Replacing a capacitor is usually cost-effective compared to repairing other components damaged by a failed capacitor. Ensuring the replacement matches the µF rating and voltage is essential for system compatibility.
FAQ
Can I test an AC capacitor without removing it?
No. The capacitor must be disconnected from the circuit to prevent inaccurate readings and ensure safety.
What capacitance reading indicates a bad capacitor?
A reading more than ±6% from the rated microfarads or a reading of zero or infinity typically indicates a faulty capacitor.
Is it safe to test a capacitor with the power on?
No. Capacitors store high voltage. Always turn off power and discharge the capacitor before testing.
How often should AC capacitors be tested?
Capacitors should be inspected and tested during annual AC maintenance or when experiencing startup or cooling issues.
Can a failing capacitor damage other AC components?
Yes. A malfunctioning capacitor can overwork the compressor or fan motor, potentially causing electrical or mechanical damage.
Conclusion
Testing an AC capacitor with a multimeter is a reliable way to determine if the component is functioning correctly. The capacitor provides critical energy to start and run compressor and fan motors. Testing requires turning off power, discharging the capacitor, and using the multimeter in capacitance mode to measure its microfarad rating. Readings outside the ±6% tolerance indicate a faulty capacitor. Regular inspection and testing prevent further damage to the AC system and maintain efficient operation. Replacing a defective capacitor with the correct rating ensures reliable performance and extends the lifespan of the air conditioning system.
How to Replace AC Compressor
The AC compressor is a vital component of an air conditioning system. It circulates refrigerant through the system, enabling heat exchange and cooling. When the compressor fails, the AC cannot cool properly, and replacement becomes necessary. Understanding the process, safety considerations, and potential costs helps homeowners manage repairs effectively.
Signs a Compressor Needs Replacement
Several indicators suggest a failing AC compressor. The unit may produce warm air despite running continuously. Unusual noises such as clanking, rattling, or humming can indicate mechanical failure. The compressor may also trip the circuit breaker frequently due to electrical issues.
Another sign is refrigerant leaks near the compressor. Corrosion or oil stains on the unit may indicate that the internal components are damaged. If the system repeatedly cycles on and off without cooling effectively, the compressor could be at fault. Timely replacement prevents further damage to the AC system.
Preparing for Compressor Replacement
Before starting the replacement, the AC system must be powered off at the breaker. It is essential to recover the refrigerant using certified recovery equipment to comply with environmental regulations. Handling refrigerants without certification is illegal and hazardous.
Identify the correct replacement compressor based on the make, model, and refrigerant type of the AC system. Compressors are designed for specific systems, and incorrect units may cause inefficiency or damage. Check voltage, phase type, and mounting style to ensure compatibility.
Steps to Replace the AC Compressor
The process begins by disconnecting electrical wiring from the old compressor. Marking the connections helps ensure proper reconnection. Next, remove refrigerant lines and mounting bolts. The compressor may be heavy, so using proper lifting techniques or support is important to prevent injury.
Install the new compressor by positioning it securely and tightening mounting bolts to the manufacturer’s specifications. Reconnect the refrigerant lines using the correct fittings and torque settings. Electrical connections should be restored according to the wiring diagram.
The system must then be evacuated using a vacuum pump to remove moisture and air from the refrigerant lines. Once the system reaches the required vacuum level, recharge with the correct type and amount of refrigerant. Testing the system ensures proper operation, including verifying pressures, temperatures, and electrical performance.
Safety Considerations
Replacing an AC compressor involves handling high-pressure refrigerants, electrical components, and heavy equipment. Improper handling can cause injury or system damage. Only certified HVAC technicians should perform refrigerant recovery, evacuation, and recharge.
Electrical safety is critical. Ensure the breaker is off, and all connections are properly insulated. Avoid bypassing safety devices such as fuses or pressure switches. Proper tools, protective equipment, and adherence to local regulations are necessary for safe replacement.
Maintenance After Replacement
After installing a new compressor, regular maintenance helps prolong its life. Inspect refrigerant levels and recharge if necessary. Clean or replace air filters and ensure condenser coils are free of dirt and debris. Periodically check electrical connections and system pressures to detect potential issues early.
Monitoring the system’s operation during the first few weeks after replacement ensures that the compressor functions efficiently. Addressing minor issues promptly prevents future failures and maintains optimal cooling performance.
FAQ
How long does it take to replace an AC compressor?
Replacement typically requires 4 to 6 hours, depending on system complexity, accessibility, and refrigerant handling.
Can I replace the compressor myself?
Due to refrigerant handling, electrical work, and system evacuation, it is recommended to hire a certified HVAC technician for safe and legal replacement.
What is the cost of replacing an AC compressor?
Costs vary based on compressor type, system size, and labor. Residential replacements often range from $800 to $1,500, including parts and labor.
How do I know if my compressor is failing?
Common signs include warm air, unusual noises, frequent cycling, and visible refrigerant leaks near the compressor.
Can I use a different compressor model?
No. Compressors must match the system’s specifications, including voltage, phase, refrigerant type, and mounting style, to operate correctly.
Conclusion
Replacing an AC compressor is a complex but essential process for restoring proper cooling. Signs of failure include warm air, strange noises, and electrical issues. The replacement requires powering off the system, recovering refrigerant, removing the old compressor, installing a compatible new unit, and properly recharging the system. Safety considerations, including handling refrigerants and electrical components, are critical. Post-replacement maintenance ensures efficient operation and prolongs compressor life. Hiring a certified HVAC technician guarantees compliance with safety standards and local regulations while ensuring the AC system functions reliably.
Lights Dim When AC Turns On
Experiencing dimming lights when an air conditioner starts is a common issue in homes. This usually occurs when the AC draws a high amount of electrical current during startup. Understanding the causes, potential risks, and solutions helps homeowners maintain safe and efficient operation of both lighting and cooling systems.
Why Lights Dim When AC Starts
Air conditioners have compressors and motors that require a large surge of electricity at startup, known as inrush current. This temporary surge can cause voltage drops in the home’s electrical system, resulting in dimming lights. The effect is usually brief, lasting only a few seconds while the AC motor stabilizes.
Older homes with outdated wiring or lower capacity electrical panels may experience more noticeable dimming. High-resistance connections, undersized wires, or shared circuits with other appliances can exacerbate the voltage drop. Homes with multiple large appliances running simultaneously may also see a more significant effect.
Electrical Factors That Contribute to Dimming
The size and condition of the home’s electrical service panel play a key role. Most modern homes have 100 to 200 amp panels, which can handle multiple high-power appliances. Smaller panels or overloaded circuits may struggle when an AC unit starts, causing noticeable light dimming.
Loose or corroded connections at the panel, outlets, or junction boxes increase resistance, which amplifies voltage fluctuations. Poorly balanced circuits, where multiple high-load appliances are connected to the same breaker, also contribute to dimming.
The type of lighting can influence perception. Traditional incandescent bulbs are more sensitive to voltage drops and may visibly dim. LEDs and compact fluorescent bulbs are less affected but can still flicker if voltage fluctuation is significant.
Solutions to Reduce Dimming
One solution is to ensure that the AC is on a dedicated circuit. A dedicated line prevents other appliances from sharing the startup load, reducing voltage drop. Installing a larger service panel or upgrading wiring may be necessary in older homes to handle modern electrical loads.
Adding a soft starter or hard start kit to the AC compressor reduces inrush current during startup, minimizing the impact on household voltage. Regular maintenance, including checking for loose or corroded connections in the panel and at outlets, ensures the system operates efficiently.
Balancing electrical loads across different circuits also helps. Avoid running multiple high-power devices on the same line as the AC, especially during hot summer months when the AC cycles frequently.
Safety Considerations
While brief dimming is usually not dangerous, persistent or severe dimming may indicate an overloaded or faulty electrical system. Overloaded circuits can lead to overheating, tripped breakers, or electrical fires. Consult a licensed electrician to assess wiring, panel capacity, and circuit loads.
Do not ignore repeated dimming or flickering lights, as this can indicate potential hazards. Ensuring that the electrical system meets current codes and can handle the home’s appliances is essential for safety and reliability.
FAQ
Why do lights dim when my AC turns on?
The AC motor requires a large surge of electricity at startup, causing a temporary voltage drop and dimming lights.
Is this dangerous?
Short, mild dimming is usually safe. Persistent or severe dimming may indicate wiring or panel issues that require professional inspection.
Will upgrading my panel help?
Yes. A higher-capacity panel and dedicated circuits can reduce or eliminate dimming by handling high electrical loads more efficiently.
Can I reduce dimming without electrical upgrades?
Installing a soft starter for the AC or balancing appliance loads across circuits can reduce the inrush current impact and minimize dimming.
Do LED lights dim as much as incandescent bulbs?
LEDs and compact fluorescent lights are less sensitive to voltage drops and generally dim less, but significant voltage fluctuations can still cause flickering.
Conclusion
Lights dimming when an AC turns on is typically caused by the inrush current drawn by the compressor and fan motors. Temporary dimming is common, especially in older homes with smaller electrical panels or shared circuits. Addressing the issue may involve installing a dedicated AC circuit, upgrading the electrical panel, or adding a soft starter to the system. Regular maintenance and inspection of wiring connections help prevent excessive voltage drops. Persistent or severe dimming should be evaluated by a licensed electrician to ensure safety and prevent potential hazards. Proper electrical capacity and balanced loads maintain reliable AC operation and consistent lighting throughout the home.
